1

2

3

4

5

Tuesday, September 21, 2010

Glossy Emblem Text Effect

In this tutorial, we’ll demonstrate how to create the following nice looking Glossy Emblem Text Effect with Adobe Photoshop in 4 simple steps.


With just one text layer and a few layer styles you can have yourself a deliciously glossy emblem text effect in no time. Since the entire effect is done on a vector text layer, you’ll be free to change the font face or letters to suit your needs and still retain all of its styling. As a final touch, we’ll add a simple shadow to give it some perspective and realism.

Step 1
Fire up Photoshop and set your canvas to 800×600. We’ll be using a dark perforated material for the background. This can easily be made by cutting out a pattern of circles from your background and applying a subtle bevel. Feel free to grab the background from the PSD file or use another texture if you wish.


Step 2
Next, lay out your type. I’m using black Trajan, 425px in size to cover most of our area. A couple of letters will do for now.


Step 3
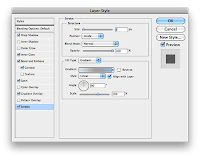
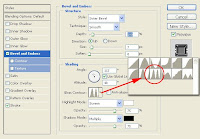
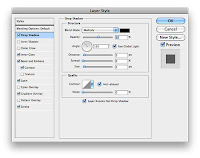
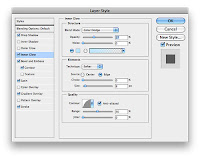
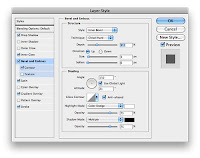
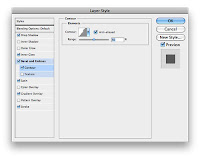
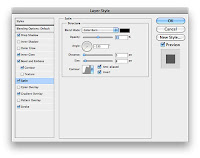
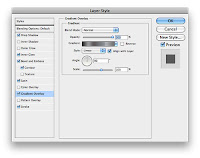
Now lets slap on a barrage of layer effects. Start off by selecting your text and going to Layer > Layer Style > Drop Shadow and enter in the settings below. Then continue down the list while paying close attention to each setting and blending mode. Also take note of the different contour maps being used. You can find a larger array of contour maps.


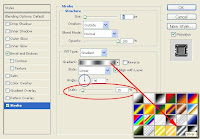
A closer look at the color ramp for your Gradient Overlay:
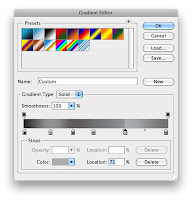

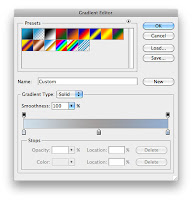
And here’s what your stroke’s gradient should look like:



You should now have a beautifully reflective emblem with metal trim. But lets add that last shadow for a little depth.

Step 4
Ctrl (Command for Mac) + click on your text layer’s thumbnail (the white box with the capital ‘T’) in the layer’s palette to select it. Now create a new layer underneath your styled text by pressing Ctrl + Shift + N. Fill this selection with black and Ctrl (Command for Mac) + D to deselect. Apply a Motion Blur filter with a -85 degree angle and 39px of distance. Finally, nudge this layer down a tad so most of the shadow falls below your type.



Congratulations, you’ve created a slick type effect in minutes that’ll compliment your next project and maybe even garner praise from your boss, friends or peers.


Original Tutorial click me

Monday, September 20, 2010

Cropping photos / Memotong Foto

1. Load the photo
Here's a photo that we want to crop, but not in the usual rectangular way.


2. Where is it hiding?
All you have to do is to find the Elliptical Marquee Tool. Bring the cursor over the first button of the toolbar on the left. By factory default, the button is the Rectangular Marquee Tool. Click and hold the left mouse button to display a dropdown with more choices. From the second row, select the elliptical marquee. This tool lets you make selections of a round or oval shape in the picture.


3. Oval
Bring the cursor to one corner of the area to be selected, click and hold the left mouse button, and drag towards the opposite corner. Release the button to finish the selection.

Click and hold the button inside the selection to drag it about the picture, and read on to learn how to resize or reshape it.


4. Shaping
To resize or reshape the selection marquee, click Select/Transform Selection in the menu. The eight handles that are now displayed enable you to transform the selection as you wish. To resize it while keeping the current aspect ratio, drag a corner handle while keeping the Shift key pressed. If you got the shape and size you want, press Enter to finalize.


5. As you like
The selection is done, now you have to decide if you want to do something with the area inside or outside it.

For example, to copy the inner area into another picture, press Ctrl+C, open the other image, and press Ctrl+V to paste.

However, if you want to remove the areas outside the selection, to give a border of sorts to the image, you have to invert the selection. Right-click inside the marquee, and in the context menu, click Select Inverse. This way, the outer area becomes selected. Now you can simply press Delete to remove the outer parts. This gives you the oval border visible above.

Of course, you cannot save the image as an oval shape as the operating systems do not handle "round" windows and image files.

the original tutorial this is Click me

3D Text Effect in 7 steps / Membuat text 3D dalam 7 langkah

In this tutorial we will be learning how to make an incredible chrome text effect in just a few steps.
Final Preview of the Chrome text


Open a document 600 x 400 px, with a black background.
From the Tool Menu, select the Type Tool (T).
Select “Times New Roman” font and set the font size to 160 pt.
Type the text. Change the color to #d5d5d5.

Apply Bevel with the following settings. Shading is one of the main thing in this chrome text effect. Select the Gloss Contour.

Apply strokes with silver gradient, and change the default value if scale.


Now to add a little shine, we will make a X mark with Brush of 5px as below.

Apply Gaussian blur with the following settings.

Result will as below.

Duplicate the text layer 2 times. Shift 2px left and 2 pixel down.The result will be as below.

We are done.

Hope you Enjoyed it!

Final

the original tutorial =>=>

Changing Colors in a Photo / Mengganti warna pada foto

Sometimes we would like to view our photos in a different format by changing their color scheme and we can do that to individual pieces in the photo.

I'll use this photo to demonstrate one way to change colors in a photo.

The first thing we need to do is duplicate the original photo and you can do that by dragging the background photo onto the Create a new layer icon at the bottom of the layers palette.

Now change to the Quick Selection tool or press the letter W.

Make sure the brush you're using is 100% Hardness.

Sometimes more gets selected than we want so to fix that, press the Alt key using Quick Selection tool to deselect it.

Next, go to Layer and New and select Layer via Copy or Control+J. Now press the Control key mouse click in the new layer to select the item.

Click on Create a new fill or adjustment layer icon at the bottom of the layers palette.

Now move the slider under Hue to different positions to choose the color you want.

You can use that same process as above on other items in the photo. Remember, this is only one way to make color changes.

The original tutorial web this is

Click it / klik disini