1

2

3

4

5

Monday, September 20, 2010

Cropping photos / Memotong Foto

1. Load the photo
Here's a photo that we want to crop, but not in the usual rectangular way.

2. Where is it hiding?
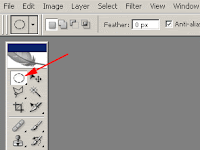
All you have to do is to find the Elliptical Marquee Tool. Bring the cursor over the first button of the toolbar on the left. By factory default, the button is the Rectangular Marquee Tool. Click and hold the left mouse button to display a dropdown with more choices. From the second row, select the elliptical marquee. This tool lets you make selections of a round or oval shape in the picture.
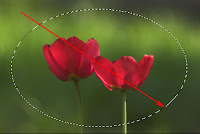

3. Oval
Bring the cursor to one corner of the area to be selected, click and hold the left mouse button, and drag towards the opposite corner. Release the button to finish the selection.

Click and hold the button inside the selection to drag it about the picture, and read on to learn how to resize or reshape it.
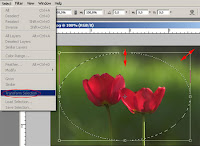


4. Shaping
To resize or reshape the selection marquee, click Select/Transform Selection in the menu. The eight handles that are now displayed enable you to transform the selection as you wish. To resize it while keeping the current aspect ratio, drag a corner handle while keeping the Shift key pressed. If you got the shape and size you want, press Enter to finalize.
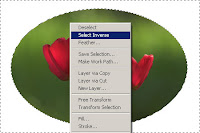


5. As you like
The selection is done, now you have to decide if you want to do something with the area inside or outside it.

For example, to copy the inner area into another picture, press Ctrl+C, open the other image, and press Ctrl+V to paste.

However, if you want to remove the areas outside the selection, to give a border of sorts to the image, you have to invert the selection. Right-click inside the marquee, and in the context menu, click Select Inverse. This way, the outer area becomes selected. Now you can simply press Delete to remove the outer parts. This gives you the oval border visible above.

Of course, you cannot save the image as an oval shape as the operating systems do not handle "round" windows and image files.

the original tutorial this is Click me

3D Text Effect in 7 steps / Membuat text 3D dalam 7 langkah

In this tutorial we will be learning how to make an incredible chrome text effect in just a few steps.
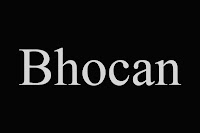
Final Preview of the Chrome text


Open a document 600 x 400 px, with a black background.
From the Tool Menu, select the Type Tool (T).
Select “Times New Roman” font and set the font size to 160 pt.
Type the text. Change the color to #d5d5d5.

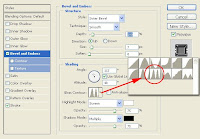
Apply Bevel with the following settings. Shading is one of the main thing in this chrome text effect. Select the Gloss Contour.

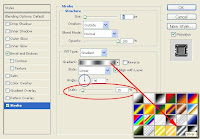
Apply strokes with silver gradient, and change the default value if scale.


Now to add a little shine, we will make a X mark with Brush of 5px as below.

Apply Gaussian blur with the following settings.

Result will as below.

Duplicate the text layer 2 times. Shift 2px left and 2 pixel down.The result will be as below.

We are done.

Hope you Enjoyed it!

Final

the original tutorial =>=>

Changing Colors in a Photo / Mengganti warna pada foto

Sometimes we would like to view our photos in a different format by changing their color scheme and we can do that to individual pieces in the photo.

I'll use this photo to demonstrate one way to change colors in a photo.

The first thing we need to do is duplicate the original photo and you can do that by dragging the background photo onto the Create a new layer icon at the bottom of the layers palette.

Now change to the Quick Selection tool or press the letter W.

Make sure the brush you're using is 100% Hardness.

Sometimes more gets selected than we want so to fix that, press the Alt key using Quick Selection tool to deselect it.

Next, go to Layer and New and select Layer via Copy or Control+J. Now press the Control key mouse click in the new layer to select the item.

Click on Create a new fill or adjustment layer icon at the bottom of the layers palette.

Now move the slider under Hue to different positions to choose the color you want.

You can use that same process as above on other items in the photo. Remember, this is only one way to make color changes.

The original tutorial web this is

Click it / klik disini


Thursday, June 24, 2010

Pembayaran ke Dua dari Donkeymails.com


Ini adalah bukti pembayaran kedua dari PTC yang telah lama dipercaya membayar para membernya. Donkeymails.com sebuah web PTC yang telah dipercaya membayar para clickers nah tunggu apalagi hayo ikutan di PTC yang terpercaya ini...cara klik banner berikut

DonkeyMails.com: No Minimum Payout


Wednesday, June 23, 2010

Bukti Pembayaran dari smileyclicks.com


Gambar tersebut adalah bukti dari pembayaran dari PTC smileyclicks.com yang pertama keakun Paypal saya.. jangan dilihat kecilnya tapi keseriusan admin yang benar-benar membayar para membernya...

nah bagi kamu-kamu yang tertarik dan ingin bergabung silahkan klik banner berikut ini


Tuesday, June 22, 2010

Bukti Pembayaran Paidtoclick.in


Gambar itu merupakan bukti pembayaran dari PTC Paidtoclick.in yang pertama kalinya ke akun Paypal saya jangan liat sedikitnya tapi bukti dari pembayaran ini menandakan bahwa PTC ini bukanlah SCAM

nah bagi kamu-kamu yang ingin bergabung dengan PTC ini silahkan klik banner dibawah ini -->


Saturday, June 12, 2010

Bukti Pembayaran dari IndoClix.com


Pembayaran di atas datangnya dari Indoclix. Indoclix merupakan PTC lokal yang berbeda di antara PTC lokal lain. Kita bisa mendapatkan uang tidak hanya lewat klik iklan tapi bisa juga lewat promosi link referral kita. nah klo kamu_kamu tertarik hayo gabung gratiiisss... klik banner/gambar berikut